Cook's Country
Duck and Dessert with Flair
9/21/2024 | 26m 25sVideo has Closed Captions
Duck Breasts with Port Wine-Fig Sauce, Apple Tarte Tatin; Tarte Tatin’s origin story
Julia Collin-Davison makes Bridget Lancaster Duck Breasts with Port Wine-Fig Sauce. Toni Tipton-Martin tells the story of the Tatin sisters and the history of their namesake dish, and Bridget makes Julia Tarte Tatin.
Cook's Country is presented by your local public television station.
Distributed nationally by American Public Television
Cook's Country
Duck and Dessert with Flair
9/21/2024 | 26m 25sVideo has Closed Captions
Julia Collin-Davison makes Bridget Lancaster Duck Breasts with Port Wine-Fig Sauce. Toni Tipton-Martin tells the story of the Tatin sisters and the history of their namesake dish, and Bridget makes Julia Tarte Tatin.
How to Watch Cook's Country
Cook's Country is available to stream on pbs.org and the free PBS App, available on iPhone, Apple TV, Android TV, Android smartphones, Amazon Fire TV, Amazon Fire Tablet, Roku, Samsung Smart TV, and Vizio.
Providing Support for PBS.org
Learn Moreabout PBS online sponsorship♪♪ -"Cook's Country" is about more than just getting dinner on the table.
We're also fascinated by the people and stories behind the dishes.
We go inside kitchens in every corner of the country to learn how real people cook.
And we look back through time to see how history influences the way we eat today.
We bring that inspiration back to our test kitchen so we can share it with you.
This is "Cook's Country."
♪♪ -Today on "Cook's Country," Julia and Bridget make duck breasts with port wine fig sauce.
I'll share the quirky history of tarte tatin.
Then Bridget makes a beautiful version of it.
That's all right here on "Cook's Country."
♪♪ -Funding for this program has been provided by the following.
-Monument grills, offering innovative technology and design for the grilling enthusiast.
With a lineup of gas grills to suit every level, our mission is to ignite your passion to pursue the art of grilling.
Learn more at monumentgrills.com.
♪♪ -There are restaurant dishes that are difficult to re-create in your home kitchen.
Maybe you don't have the time or you don't have the equipment or you don't want to put in the effort.
Well, then there are restaurant dishes that you should be making at home.
So should I, but I don't, like duck.
I love ordering it on menus, but I don't make it at home until now, because Julia is going to show us a very easy way to prepare duck.
-That's it.
Now, duck is as easy to prepare as a chicken breast.
In fact, I think it's easier, because duck has more flavor and you have that gorgeous duck fat to work with.
-Mmm.
It's known as better chicken.
-[ Laughing ] It is, actually.
So the first thing you got to do is get your hands on some duck.
-Okay.
-And these are from the supermarket.
These are 7- to 8-ounce duck breasts.
Now, these are Pekin duck breasts... -Okay.
-...which is usually what you find at the supermarket.
And what you want to do is you want to score the fat.
You see, I've already scored two.
I'm gonna score these two.
That really helps that fat render.
And that is the key to making good duck.
-All right.
-So, sharp knife.
Turn the duck over.
Look for any bits of silverskin that might be a little chewy.
You just want to take those out.
And trim any excess fat.
You want to leave a little, because it renders and it shrinks in the pan.
All right.
So like I said, you want to score this fat.
You don't want to go through the meat, just through the fat.
Gonna do a hatch-mark pattern, about half-inch between hashes.
So, going one direction.
So do that way.
And then I like to actually turn the breast the other direction.
Makes it easier to do a nice hatch mark.
The other trick -- season these thoroughly.
I'm gonna pat them dry top and bottom.
Now we're going to season them with a lot of salt and pepper.
This is 2 teaspoons of kosher salt and 1 1/2 teaspoons of ground black pepper.
Season it liberally on both sides.
So you want to give the salt some time to work.
So you want to do this at least six hours advance.
But you could do it up to 24 hours in advance.
Just gonna cover this with plastic wrap, wash my hands, and we'll put it in the fridge.
All right, this duck has been salting for at least six hours.
It's time to get cooking.
-All right.
-So here I have a nice 12-inch nonstick skillet.
And this is the method that works with no matter what kind of duck breeds you have, because it starts in a cold skillet.
Heat's not on yet.
So what I'm gonna do is lay the duck in the skillet fat side down, because rendering the fat is really the most important part.
Otherwise, it tastes too flabby.
-Sure.
-But, you know, the meat itself, it's as thin as a boneless, skinless chicken breast.
-Right.
-It'll cook like that.
So you want to give that fat time to render and get good and crisp.
So, we're going to turn the pan on medium heat.
Anywhere from 17 to 20 minutes.
So while that's cooking, we're going to make a quick sauce.
-Okay.
-Now, once you know how to make this sauce, you'll find yourself making it for everything, because it is so simple and so good.
-Great.
-All right.
So it's figs and port.
Classic combination with duck.
So this is 1/4 cup of black mission figs.
And we're just gonna cut them in half.
That way, they can soften nicely in the sauce as the sauce simmers.
All right, so into the little sauce pan they go.
Now we're going to add the port.
This is Ruby Port.
Just 1/2 cup.
-Okay.
-No need to use any fancier, expensive port.
The least expensive Ruby Port is perfect here.
-Gotcha.
-So we're gonna gussy up the flavor with some vinegar.
This is 1/4 cup of red wine vinegar.
Give it a little punch.
And last, a little sugar.
3 tablespoons of sugar.
A little sweet, little vinegar, a lot of port.
-Sure.
-We're gonna put this over medium heat.
We're just gonna let this simmer on its own about 15 minutes.
The sauce will reduce.
It'll look a little syrupy.
And the whole thing will measure about 1/2 cup.
-Fantastic.
-That's it.
-That's it?
-It's the waiting game.
Mmm.
Don't things smell good?
-They smell amazing.
-All right.
This sauce is done.
It's been reducing for 15 minutes.
You can see the texture of the sauce.
It's reduced, and it's just slightly thickened.
But as this cools, it'll get even thicker.
-It's just on the cusp of being a syrup.
-Yep.
So I'm going to set it aside off the heat.
Now let's take a look at our duck that's been cooking over here on its own.
I've been checking it periodically, obviously.
-Yes.
-All right, let's take a look.
-[ Chuckling ] Oh!
-Oh, goodness.
Ohh, one more beautiful than the next.
-Oh!
Can't get that with a chicken.
-Nope.
Slow and low is the tempo for this.
Now, on this backside, where there's no skin, I'm gonna turn the heat down to medium-low.
And it really only takes a minute or two to finish cooking that meat through.
-Gorgeous.
-I'm guessing you like medium-rare duck?
-I love medium-rare duck.
-Same.
So we want to cook it to about 125 degrees.
-Okay.
-All right.
It's been about two minutes on this second side.
Doesn't take long to finish cooking that duck through.
And it's just slowly cooking in that rendered duck fat.
All right.
So again, we're gonna take the temperature -- medium rare.
We're looking for 125 to 130, somewhere like that.
Ooh, there we have it.
127.
Perfect.
All right.
Off goes the heat.
Duck comes out of the pan.
And I'm gonna put it on a wire rack and just let it rest for about 10 minutes, let those juices redistribute before we dive in.
Cover with foil.
We're gonna let those take a little 10-minute nap under their space blanket.
-Okay.
-And meanwhile, this fat, I'm not gonna throw it away.
-Thank you.
-This is liquid gold.
-Sure is.
-I'm gonna set it off heat, let it cool down a little bit.
Then I'll strain it and put it in the fridge to use again later.
-Save that fat.
-Okay.
The duck has been resting.
Et Voilà.
-Mmm-mmm-mmm.
-All right.
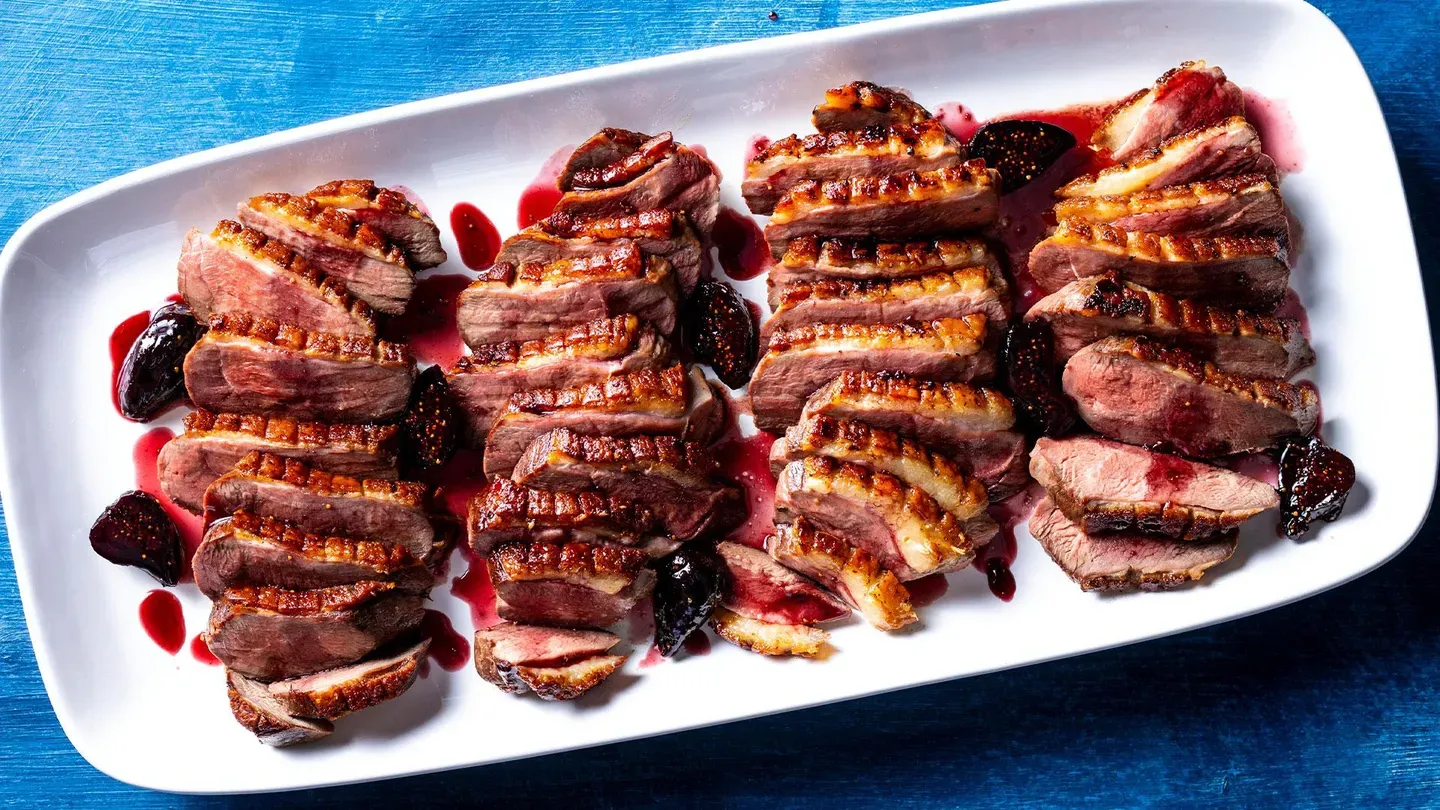
So now I'm gonna slice these up on a gorgeous bias, make a beautiful platter.
Oh-ho-ho!
-Beautifully pink.
-Medium-rare right in the center.
-Getting a little bit of that duck crackling fat on top of every piece.
-Mm-hmm.
-Yum, yum.
-Yep.
All right.
I'm gonna put this on a platter.
There we go.
Oh-ho-ho-ho-ho.
-Oh!
-Ohh, perfect medium-rare.
You know, some people like it a little more well-done, and that's okay, too.
-Sure.
-There are instructions for that in the recipe if you like it medium.
-Mm-hmm.
-Oh, perfectly cooked, all of them.
Here's the sauce that has been cooling.
-Mmm!
-It's still warm.
You can see it's just a little bit thicker.
-Yes.
[ Gasps ] -And it just glides right over the meat.
-Mmm!
-I'm gonna save the rest of this for our plates.
-Yes, please.
-All right.
I'm gonna go for the back end here.
-Ohh!
-Lovely.
A little extra sauce with a few of those figs.
-Mmm!
Gorgeous!
-Mm-hmm.
-Oh, enjoy, Bridget.
-I -- I know I will.
-It feels like a special occasion when you have duck, doesn't it?
-It sure does.
-Duck has so much flavor.
And that crisp skin on top.
And that pepper and salt.
-Beautiful, beautiful flavor.
And it's luscious.
It's rich, even though it's duck breast.
-Yep.
-It's the breast, but it still has all that gorgeous marbling and fat.
It's just beautiful.
-Yeah.
And with a little bit of port... -Mmm.
Oh, the port is lovely.
-...the fig, and that black pepper kind of sneaks up at the end.
-I need to get some of that peppery crust.
-Mmm.
Mm-hmm.
-Mmm.
Beautifully seasoned.
-Right.
And it's so foolproof when you start in a cold skillet.
You're really not gonna go wrong.
-But don't tell anybody how easy it was to make.
[ Whispers ] Don't tell anyone.
[ Normal voice ] Thank you.
-My pleasure.
-You should be making duck at home, too, and it starts this way.
Score the skin and salt for several hours.
Start skin side down in a cold skillet.
Meanwhile, simmer Ruby Port, figs, and vinegar for an elegant sauce.
So, from "Cook's Country," the better chicken, duck breast with port wine fig sauce.
-So good.
-So great.
-Mm-hmm.
♪♪ -Have you ever made a mess in the kitchen while baking a cake?
I know I have.
Now, imagine if that mess became your legacy.
That's exactly what happened if we believe the story behind the French dessert tarte tatin.
Stéphanie and Caroline Tatin were sisters who ran a hotel in the small town of Lamotte-Beuvron.
According to legend, one of the sisters accidentally put an apple tart in the oven upside down but decided to serve it to the hotel guests anyway.
The resulting dish was a hit, and the tarte demoiselle tatin was born.
Tarte tatin began to appear throughout France.
In 1926, Curnonsky, known by many as the Prince of Gastronomy, published a recipe titled "The Famous Apple or Pear Tart from the Demoiselle Tatin of Lamotte-Beuvron."
And by the 1930s, tarte tatin was being served at Maxim's, a trendy restaurant in Paris.
But was tarte tatin really created by accident?
It is a fun story, but it's probably not likely.
Several sources believe that tarte tatin stems from the French tradition of baking tarts upside down, or renversé.
These types of baked fruit dishes existed long before the Tatin sisters were even born.
For our version of tarte tatin, we made all the mistakes so you won't have to.
♪♪ -Tarte tatin is a classic French dessert with soft caramelized apples beautifully arranged on a buttery crust.
And by all appearances, it's a fairly simple dessert, but it can be a little tricky to make just right, which is why I'm excited that my favorite pastry chef and good friend Bridget is here to show us a foolproof method.
-Yeah, it's one of those desserts, I don't know how the French do it, but it's a little bit refined and rustic at the same time.
-Yes.
-So before we get to the caramelized apple part, we're gonna work with the dough.
So I've got 5 ounces here.
Always a good idea to weigh your dry ingredients.
This is all-purpose flour.
5 ounces, or a cup.
We're gonna add a little bit of sweetness.
I've got 2 teaspoons of sugar and 1/2 teaspoon of table salt.
Just regular old table salt goes in there.
I'm gonna blitz this for a few seconds, until it comes together.
All right.
So next up, we're adding butter.
This is 8 tablespoons of very cold butter, chilled.
So we've cut it into half-inch pieces and then let it chill in the fridge.
You can even put it in the freezer if it's really, really soft.
You don't want it to be frozen.
You just want it to be very, very chilled.
That way, the resulting pastry will not be greasy.
So I'm just gonna pulse this a few times.
I'm not looking for the butter to be totally incorporated.
But we're not done yet, so about five pulses should do it.
All right, knock down that flour on the side.
There we go.
All right.
Obviously, I don't know if you can see in there.
-Mm-hmm.
-Let me pull a little bit out.
-Yeah, the butter is different sizes.
There's some very tiny bits that have been worked in but some big chunks, too.
-Yeah.
You get some of these big chunky pieces and some smaller bits.
So, not done yet.
I do need to add water.
This is ice water.
Just got some water and ice in here.
And I just want to pour out 1/4 cup.
So this is gonna go right in here all at once.
All right.
So now I'm gonna let this go about 10 seconds, until it really does come together.
After about five seconds, I'll go in, scrape down any sides, make sure it's all evenly mixed.
So I'm gonna just dump this out onto a clean countertop here.
And also very hydrated.
And you're gonna see that is gonna definitely work out for us to our advantage.
I'm gonna bring some bench flour down here.
I basically, at this point, want to mush it together and then start working it into a five-inch disk.
So let me go ahead and roll this out.
I'm gonna use a bench scraper because it is sticking a little bit to my surface here.
I'm gonna flour the bench and flour the dough a little bit.
It's really well-hydrated, so we can use some flour here.
I want to roll this out to about a nine-inch circle.
And if I do see any cracks around the edges, I do want to start to get them into non-cracky appearance.
-No cracks allowed.
-And I am turning this each time that I roll it, trying to keep it a nice circle.
We do want to pay attention here to the shape, because this is -- Again, tarte tatin is always made in a skillet, so -- or a round dish.
-Mm-hmm.
-And we want to make sure that we don't, A, make this too big and it won't fit in, but also, that it's beautifully round so that it covers just the right amount of apple filling.
All right.
So now we want to get it on a half sheet pan here.
It's been lined with parchment paper.
So I'm going to use my rolling pin just to gently transfer that.
-Mm.
-You can reshape it back into that circle as needed.
Looking for crack-free edges here.
-That is a gorgeous-looking piece of pastry.
-All right, one more thing that we're gonna do at this point.
We're gonna make a few slits in this so that, when this goes and tops the apples and it bakes in the oven, has a little bit of an escape route for the steam.
So I'm just going to make three slits about an inch and a half, two inches.
There we go.
All right.
So a little bit of plastic goes on top.
And this is going to go into the fridge.
We want it to really chill down, get nice and firm.
That's gonna take at least two hours.
But you can do this up to 48 hours in advance.
So this is the point of the recipe where, traditionally, we would start to make a caramel first and then we'd add the apples, and you'd hope that you made the right amount of caramel for the right amount of juice that was gonna come out of the apples.
So we're gonna switch things up a little bit.
I've got a tablespoon of unsalted butter here going into a 10-inch nonstick skillet.
And you want to make sure it's oven-safe.
And I'm going to turn this to medium-low.
We're gonna let that melt there while we work on the apples.
We're using five apples.
-You're very specific about the number here.
-Very specific about the number and the weight.
You want to look for apples that are about 6 to 7 ounces each.
That way, we know that they're the right size.
Because often, you'll get apples that are too big, too small, and it can be a lumpy, bumpy tarte tatin.
We want to make this as elegant as possible.
So I am gonna peel it.
You want to look for apples -- Something like a Golden Delicious is a great apple to use, something that's buttery, it's going to soften but it's not going to turn to mush, it will keep a little bit of structure.
But we're going with Galas, which is another great apple to use today.
All right.
There we go.
So we're doing a minimum of prep here.
We actually want larger pieces of apple.
So I'm just gonna quarter this.
And now we want to core each quarter.
But instead of getting out an apple core, which never really gets all the core, instead you just hold this on one straight side.
-Mnh-mnh.
-And you angle just to get that core out.
Just like that.
That's it.
Let's bring these closer to the butter.
Butter's melted.
Now, I'm gonna slide this off the heat.
So now we're gonna add the apples directly to the butter.
-Mm-hmm.
-And we can take our time and make kind of a-a pretty arrangement.
Basically, I'm just kind of shingling these.
-Mm-hmm.
-So I want to make sure that I get all the apples in.
And it's not just about being neat at this point.
It really is about even apple dispersion throughout the pan.
Because sometimes if you just dump the apples in there, especially if there's chunks, you'll end up with a little bit more apple on one side than the other.
So as these go into the center, they don't have to continue the spiral.
And they're actually going to help to hold up those apples.
All right.
So I've got a little bit of table salt here -- 1/4 teaspoon.
I'm just gonna sprinkle it evenly over the apples.
It's gonna really enhance their flavor, but it's also going to help to draw out the moisture, and that's exactly what we want.
So let me scooch this back over.
And we're gonna put this on medium-low heat again.
Cover it.
And between the salt and the lid, both of those things are going to help to draw the moisture out of the apples, which is exactly what we want.
We actually want a lot of liquid to come out and flood the bottom of the pan.
So we're gonna cook this long enough so that that happens, the liquid comes out, but also, it starts to reduce just a bit.
And that's gonna take between 10 to 15 minutes.
-Okay.
-Let's see what's going on in here.
-Ooh!
Mmm!
-All right.
Juicy, right?
That only took about 10 minutes for this to happen.
You can see some bubbling action in there.
-Uh-huh.
-That's good.
We want that liquid to come out of the apples at this point.
And now I've got the lid off, we're gonna leave this for another 3 to 5 minutes, until most of that liquid has evaporated.
Smells amazing, doesn't it?
-It does.
-So, the liquid is mostly gone.
There's a little bit of sizzling still in there, but that's basically the apples getting a little sizzle-y in the butter there.
And you might see a little bit of browning on the bottom, but if you don't, that's fine, too.
But we're done with this for now.
I'm gonna slide it off heat.
-Mm-hmm.
-Now we're gonna work on a caramel separately from the apples.
-Very cool.
-All right.
So caramel starts with sugar, as all good things do.
This is 3/4 cup of granulated sugar.
It's about 5.25 ounces.
I've got some water here.
This is 1/4 cup of water, just a little bit.
And I've got 2 tablespoons of corn syrup, just light corn syrup.
And this is going to help prevent crystallization, which is the nemesis of caramel-making.
-[ Laughs ] -All right.
So I'm gonna turn this to medium-high heat.
And I'm not going to stir it at this point.
I don't want to get any of those sugar crystals around the edge of the pan.
So we're just gonna watch it, about 4 to 8 minutes.
And what I'm looking for is it'll be clear, but around the edges, it'll start getting a little straw-colored.
-Ooh!
-All right, I just started swirling a little bit, because you can see around the edges, it just turned a little bit of a straw color.
-Mm-hmm.
-So that only took about five minutes.
It's anywhere from 4 to 8, so you really need to be vigilant.
But now we want to let this go even farther.
At this point, the caramel would be really brittle and very pale.
-Mm-hmm.
-So we want it to be much deeper in color.
So I'm gonna keep swirling this, but I also want to reduce the heat down to medium-low.
-Yeah, it's just starting to get a little bit of color.
-Exactly.
Slow it down at this point.
And, really, this is important.
You want to slow down the process.
Otherwise, you'll get really unevenly browned caramel.
The outside will be very burnt, and the inside will be almost blond here.
We want a nice, even, light amber color.
So we're gonna let it go here, again over medium-low heat, until it registers between 355 and 360.
And that's how we're going to know that it's the right flavor, it's the right color, and the right consistency.
All right.
So I think this is pretty close.
-Mmm!
-You know, when it starts to get close, I like to take it off heat, swirl it around a little bit.
I think we're done.
-It's the right color.
-It is the right color, that nice amber.
It just went over 360.
-Perfect!
-Let's get it off the heat.
I'm gonna add 3 tablespoons of unsalted butter, just stop the cooking.
Very carefully adding this in.
-Mmm!
Oh, yum!
-Might have some splattering and spluttering.
There we go.
-Ohh!
-All right.
So just letting that cold butter really stop the cooking process here.
And, of course, it turns caramelized sugar into actual caramel.
So now, this is going to go over those apples.
Again, there's no heat under there.
They've just been sitting on this burner.
And see, this way, we can, again, control the color of the caramel, control the color of the apples, the doneness, everything before we even put the dough right on top.
Again, the pan is a little bit hot.
And it's not going to go all the way to the edges of the pan.
And it's going to cradle the apples, so when we turn the tarte tatin out, we're not gonna have apples everywhere.
-Oh, I love that idea.
-So this is going to go into the oven, 350.
And we want to bake it until this is beautiful and brown, and you'll see a lot of bubbling around the edges.
That's going to take anywhere from 50 minutes up to an hour.
-Okay.
Oh-ho-ho!
Oh, my... -Oui, madame.
-...goodness!
-Definitely going to wrap this handle because this is hot.
-Mm-hmm.
-Check out those bubbles.
-That is gorgeous!
-Lovely browning on top.
And the bubbles are big and beautiful.
And that's how we know that that caramel filling has thickened just enough.
-Mm-hmm.
-So, we're gonna leave this for about 20 minutes.
-Yeah.
-Let it firm up a little bit.
We still want to serve it warm.
So we'll come back in 20 minutes, and I expect the entire tarte tatin to still be in this pan.
-[ Laughs ] You better keep an eye on me.
-20 minutes.
That was the longest 20 minutes of my life.
-It was.
-But it's cooled down just enough.
You can see the bubbling has stopped, it's set up a little bit, the dough has settled in nicely.
You can actually see the little cradles over the apples.
-Yeah, you can tell where they are.
-But we don't want to let this cool off too much.
Otherwise, we're gonna eat it right out of the skillet.
We need it to be warm enough so that it releases.
So I'm gonna use a little spatula.
You can also use a plastic little picnic knife.
-Mm-hmm.
-And I'm just getting in the edges there.
-Just loosening it up.
-Yeah.
All right.
So I'm gonna invert it right over here.
And I like to have this here, the handle off to the side like this, because it allows me to flip the whole thing, rack and all.
-Rack and all?
Rack and all.
-Oh!
Here, let me help you get that like that.
-Thank you.
All right.
Just a wee bit of touch-ups there I need to do.
-Oh-ho-ho-ho-ho!
-I'm gonna take that rack.
-The apples, I love how they're just a little darker around the edge and lighter in the middle.
They're perfectly arranged on top.
-Gorgeous.
All right.
So I'm gonna cut a couple pieces.
-Okay.
-Nice crisp crust.
-Yeah.
You can hear it.
That is a thing of beauty.
-Isn't it gorgeous?
-Yeah.
-Now, I know this is a very French dessert, but think about what a change-up this would be for, like, a Thanksgiving table.
-I was just thinking that.
-Exactly.
All right, so you can serve this with ice cream.
I like to use just a little bit of really good farm-fresh cream.
Mind if I pour over?
-Just a little bit.
Yes.
Thank you.
-Just a wee bit.
Just drizzle.
It's also good with crème fraîche.
Be beautiful with that.
A little bit of tanginess.
-Going right in with a little piece of apple on that crisp edge.
-The crust, I know.
The little edge.
The toffee apple edge, right?
-Mmm.
Mmm!
It is such a simple, pure flavor.
You get apple.
-Mm-hmm.
-Then you get butter.
-Mm-hmm.
-And then you get the caramel.
And then the texture, that crisp crust.
It's almost like a crisp cookie under there, you know?
-Yeah.
-It's not like a thick pie dough.
-No.
-It's just -- It's just enough to hold up the apples.
-I love that dough.
-Mm-hmm.
-Because it is tender and it is buttery, but it's sturdy enough to stand up to this.
It's not soggy, as if we would have used a puff pastry.
It'd be completely soggy at this point.
-Strong apple flavor.
It is soft all the way through.
But you still can cut it with a knife.
-They're buttery.
They're velvety.
-Mm-hmm!
Mmm!
-Not mushy at all.
Oh, Bridget, j'adore.
-Ah!
J'adore.
Thank you.
-Thank you for showing me how to make this.
-Anytime.
-If you want to make the perfect tarte tatin, make a buttery dough in the food processor, cook Gala or Golden Delicious apples in a skillet, and make the caramel on the side.
From "Cook's Country," a fabulous and foolproof recipe for tarte tatin.
You can get this recipe and all the recipes from this season, along with select episodes and our product reviews at our website, cookscountry.com/TV.
-Visit our website, where you can sign up for the free "Cook's Country" e-mail newsletter, for even more of the recipes and stories you love from the magazine and the TV show.
CooksCountry.com/Cooks.
Want more "Cook's Country"?
Subscribe to Cook's Country magazine.
Every issue includes guaranteed fail-proof recipes, on-the-road stories, eight Dinner Tonight recipe cards, trusted reviews, and more.
Get one year of Cook's Country for $19.95.
To subscribe, visit CooksCountry.com/TVSubscribe.
♪♪ -Funding for this program has been provided by the following.
-Monument Grills, offering innovative technology and design for the grilling enthusiast.
With a lineup of gas grills to suit every level, our mission is to ignite your passion to pursue the art of grilling.
Learn more at monumentgrills.com.
♪♪ ♪♪ ♪♪ ♪♪ ♪♪ ♪♪


Cook's Country is presented by your local public television station.
Distributed nationally by American Public Television